
iPhone Won’t Turn On? How to Fix It Step by Step
Your iPhone won’t turn on, you’ve pressed every button you can think of, and the panic is starting to set in. Before you assume the worst, take a breath. Most of the time, an iPhone that won’t turn on can be fixed at home in a few minutes, and it usually isn’t the disaster it feels like in the moment. This guide walks through the exact troubleshooting order Apple recommends, starting with the fastest fixes and working toward what to do if the problem turns out to be hardware.
What matters most right now is figuring out exactly what you’re seeing, because a completely black, silent screen calls for a different first step than a screen that’s black but still buzzing when a text comes in. Below, you’ll find a quick way to identify your situation, followed by a full walkthrough of every fix in the order you should actually try them.
Which Situation Matches What You’re Seeing?
Not every “iPhone won’t turn on” problem is the same problem. Figuring out which category you’re in saves time and helps you avoid steps that won’t help — or that could make things worse.
| What you’re seeing | What it usually means | Where to start |
|---|---|---|
| Completely black screen, no sound, no vibration | Drained battery, damaged cable/port, or hardware failure | Step 1: Check the Basics |
| Black screen, but you hear notification sounds or feel vibrations | The phone is running — the display itself may have failed | Step 2: Force Restart |
| Stuck on a flashing or frozen Apple logo | Failed update, boot loop, or corrupted software | Step 2: Force Restart, then Step 5: Recovery Mode |
| iPhone feels hot to the touch and won’t respond | Thermal shutdown (a built-in safety feature) | Step 4: Let It Cool Down |
| Recently dropped in water, a pool, or the toilet | Possible liquid damage | Step 3: Check the Liquid Contact Indicator |
If you’re not sure which row fits, start with Step 1 anyway. Charging and a basic cable check rule out the most common cause before you move on to anything more involved.
Step 1 — Check the Basics Before Anything Else
Before you touch a single button combination, rule out the boring stuff. It solves this problem more often than people expect.
Charge for a full hour with a certified cable and wall adapter. Apple’s own guidance is straightforward here: plug your iPhone in and let it charge for a full hour before assuming anything is actually wrong. If you can see a low-battery icon at any point, Apple’s troubleshooting steps say 30 minutes is usually enough to bring it back to life.
Inspect and clean the charging port. Pocket lint and dust build up in the Lightning or USB-C port over time and can physically block the connection. A dry, non-metallic tool like a toothpick — used gently — is usually enough to clear it out.
Try a different cable, adapter, and outlet. Third-party cables and worn-out adapters are one of the most common, and most overlooked, reasons an iPhone won’t charge. Apple’s charging troubleshooting guide walks through this in more detail if the port itself looks fine but charging still isn’t happening.
Pro Tip: Test with a different cable and a different wall outlet before you assume the battery or the phone itself is at fault. It’s a two-minute check that rules out the single most common cause.
Step 2 — Force Restart Your iPhone (Model by Model)
If charging alone doesn’t fix it, a force restart is the next move — and it’s the step Apple recommends before almost anything else. It doesn’t erase any data. It simply cuts power to the device and starts it fresh, similar to how a stuck computer sometimes just needs a hard reboot.
The exact button sequence depends on your model, so check the table below rather than guessing.
| iPhone Model | Force Restart Steps |
|---|---|
| Face ID models (iPhone X through the current iPhone 17 lineup, including iPhone Air and iPhone 17 Pro Max) | Quickly press and release Volume Up, quickly press and release Volume Down, then hold the Side button until the Apple logo appears |
| iPhone 7 / iPhone 7 Plus | Hold Volume Down and the Side button together until the Apple logo appears |
| iPhone 6s and earlier (Home button models) | Hold the Home button and the Side (or Top) button together until the Apple logo appears |
This same sequence applies whether you’re holding an iPhone SE, an iPhone 15, or a brand-new iPhone 17 — Apple hasn’t changed the Face ID force-restart combo across recent generations, according to Apple’s official force restart instructions.
If the Apple logo doesn’t appear within about 30 seconds, or the screen stays completely black with no logo at all, go back to Step 1 and give it another hour on the charger before trying again.
Good to Know: A force restart is not the same as a factory reset. It won’t touch your photos, messages, or settings — it just forces the phone to reboot.
Step 3 — Check for a Liquid Contact Indicator
If your iPhone has been anywhere near water, a pool, a sink, or even heavy rain recently, stop and check this before you do anything else.
Every iPhone has a Liquid Contact Indicator (LCI), a small sticker-like sensor inside the SIM tray slot that turns red when it comes into contact with liquid. You’ll usually need a flashlight and a close look to see it clearly.
What a red LCI means: stop troubleshooting. Don’t force restart repeatedly, don’t try to charge it aggressively, and don’t attempt to open the phone yourself. A red indicator is a sign of internal moisture exposure, and further attempts to power the device on can sometimes worsen internal damage. This is the point where a trip to an Apple Store or authorized repair provider makes far more sense than continued DIY troubleshooting.
Important: A red Liquid Contact Indicator means it’s time to stop troubleshooting and seek professional repair, not keep trying button combinations.
Step 4 — Let an Overheated iPhone Cool Down
iPhones are designed to protect themselves. If the internal temperature climbs too high, the phone will shut down automatically rather than risk damage to the battery or internal components. This isn’t a malfunction — it’s a built-in safety feature working exactly as intended.
Common causes include:
- Being left in direct sunlight or a hot car
- Extended gaming sessions or video recording
- Long stretches of navigation while charging
- Fast charging in a poorly ventilated space
If your iPhone feels noticeably warm and won’t respond, move it somewhere cool and shaded, unplug it if it’s charging, and give it 15–30 minutes to cool before trying to turn it on again. Trying to force restart an overheated phone repeatedly won’t speed anything up and isn’t necessary.
Step 5 — Use Recovery Mode
If a force restart doesn’t bring your iPhone back, or it keeps getting stuck on the Apple logo, Recovery Mode is the next step. This connects your iPhone to a computer so it can reinstall or repair its software.
What Recovery Mode does — and doesn’t do — to your data: Choosing Update in Recovery Mode reinstalls iOS without erasing anything. Choosing Restore wipes the device completely and sets it up as new. Apple’s guidance is to always try Update first, since Restore should be treated as a last resort.
How to enter Recovery Mode:
- Connect your iPhone to a Mac or PC using a USB cable.
- On a Mac, open Finder. On Windows, open the Apple Devices app.
- On the iPhone, quickly press and release Volume Up, quickly press and release Volume Down, then hold the Side button until you see the Connect to Computer screen.
- Choose Update in Finder or the Apple Devices app, and let your computer reinstall the software without erasing your data. If that doesn’t work, repeat the process and choose Restore instead.
Is iTunes still relevant in 2026?
Not really, if you’re on Windows. Apple has moved Windows users over to the Apple Devices app, a free download from the Microsoft Store that handles backup, update, and restore the same way Finder does on a Mac. iTunes still technically works as a fallback on older Windows setups, but it’s no longer the primary tool Apple recommends, and a lot of older troubleshooting guides online haven’t caught up to that change.
Step 6 — Use DFU Mode (Last Resort Before Repair)
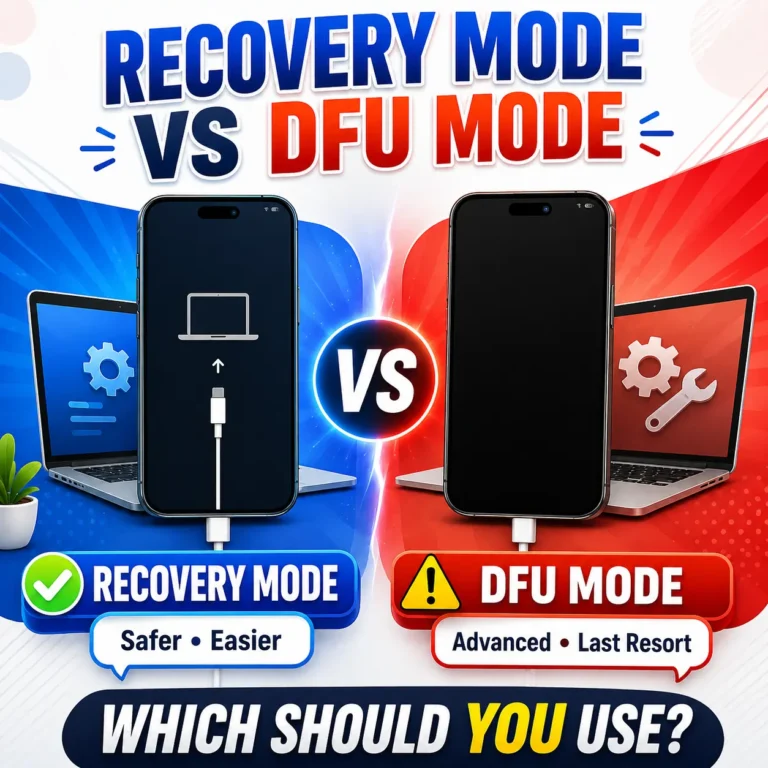
DFU (Device Firmware Update) mode is the deepest level of restore available on an iPhone. Where Recovery Mode still relies on some of the phone’s existing software to communicate with a computer, DFU mode bypasses the operating system entirely. It’s typically reserved for boot loops and software corruption that Recovery Mode alone couldn’t fix.
How DFU differs from Recovery Mode: In Recovery Mode, you’ll see an Apple logo and a “Connect to Computer” screen. In true DFU mode, the screen stays completely black the entire time — if the Apple logo appears at any point, you’ll need to start over.
Steps for Face ID iPhone models:
- Connect the iPhone to a computer with a USB cable and make sure Finder (Mac) or the Apple Devices app (Windows) is open.
- Quickly press and release Volume Up.
- Quickly press and release Volume Down.
- Press and hold the Side button until the screen goes black.
- While still holding the Side button, also hold Volume Down for about 5 seconds.
- Release the Side button, but keep holding Volume Down for another 10 seconds.
- If the screen stays black and your computer indicates it has detected a device in recovery, you’re in DFU mode. If the Apple logo shows up instead, the timing was off — restart the process.
Warning: A DFU restore erases everything on the iPhone. If your device still connects to a computer at all, back up first using iCloud or a computer backup before going any further.
Back Up or Recover Your Data Before You Go Further
This is usually the part people are most anxious about, and it’s worth addressing directly: what happens to your photos, messages, and everything else if the phone won’t turn on?
If your iPhone still responds to a computer, even in Recovery Mode, you can often create a fresh backup through Finder or the Apple Devices app before choosing Restore. This is the safest scenario — take the extra few minutes to do this if it’s an option.
If iCloud backup was already enabled before the phone stopped working, your photos, messages, and app data are likely already backed up automatically, as long as the phone had Wi-Fi and was charging at some point recently. You won’t lose anything by restoring the device — you’ll just set it up from that backup afterward.
If the device is fully unresponsive and doesn’t connect to a computer at all, your options narrow considerably. In genuinely hardware-failure situations, an Apple Store or Apple Authorized Service Provider may be able to attempt limited data recovery as part of a hardware repair, though this isn’t guaranteed and depends on which component failed.
Tip: Enable automatic iCloud backup now on any iPhone that’s currently working. It’s the single easiest way to make sure a future “won’t turn on” moment is an inconvenience instead of a total loss.
When It’s a Hardware Problem, Not Software
If you’ve worked through Steps 1 through 6 and the iPhone still shows no signs of life, the issue is very likely hardware, not something a restore can fix.
Signs pointing to a hardware issue:
- No vibration, no sound, and no recognition by a computer, even after a full hour of charging
- The phone worked fine, then stopped suddenly with no software update or drop involved
- A swollen or visibly warped back panel or screen (a sign of battery swelling)
“No signs of life after a full charge” genuinely means what it sounds like: the battery, the logic board, or the power management IC (the chip that regulates power delivery inside the phone) is the likely culprit. None of these are something to troubleshoot further at home — they call for a professional diagnosis.
Getting Professional Help
Once you’ve ruled out the software-side fixes, here’s how the repair options actually compare.
| Repair Option | Typical Turnaround | Genuine Apple Parts | Best For |
|---|---|---|---|
| Apple Store Genius Bar | Same day (by appointment) | Yes | In-person diagnosis, fastest resolution |
| Apple Authorized Service Provider (AASP) | 1–3 days | Yes | No nearby Apple Store |
| Mail-in Apple repair request | 5–10 days | Yes | No nearby Apple Store or AASP |
| Independent repair shop | Same day to a few days | Varies — ask first | Budget repairs out of warranty |
Apple Store Genius Bar: Book an appointment through Apple’s site rather than walking in, since wait times vary a lot by location and day.
Apple Authorized Service Provider: These are independent shops certified by Apple to use genuine parts, and they’re a solid option if there’s no Apple Store nearby.
Mail-in Apple repair request: Apple will send a box, you ship the phone in, and they handle diagnosis and repair remotely.
Independent repair shops: These can be faster and cheaper, but ask specifically whether they use genuine or high-quality OEM parts before committing, particularly for a battery or screen.
How AppleCare+ affects cost: If your iPhone is covered by AppleCare+, hardware failures unrelated to accidental damage are often covered at little to no cost. Without coverage, repair pricing varies by model and the specific component involved, so it’s worth getting a quote from more than one option before committing. Apple’s device repair page has current pricing information by model.
How to Prevent This From Happening Again
A few habits go a long way toward making sure this doesn’t happen twice:
- Use MFi-certified cables and chargers. Cheap, uncertified cables are a leading cause of charging failures.
- Keep iOS updated. Update-related boot issues are rare, but they’re more common on outdated software versions.
- Enable automatic iCloud backup. Check under Settings, then your name, then iCloud, to confirm it’s turned on.
- Avoid extreme heat and moisture exposure. Don’t leave your phone in a hot car or expose it to heavy rain without a case rated for it.
- Monitor battery health over time. Under Settings, Battery, Battery Health, you can see if your battery’s maximum capacity has degraded enough to warrant a replacement before it fails outright.
Frequently Asked Questions
Why won’t my iPhone turn on even though it’s plugged in?
It could be a damaged cable, a blocked charging port, or a battery that’s too drained to respond right away. Try a different cable and outlet, and give it a full hour before assuming it’s something more serious.
How do I force restart an iPhone that isn’t responding?
On Face ID models, quickly press Volume Up, then Volume Down, then hold the Side button until the Apple logo appears. Older Home button models use a different combination — check the model table above.
What’s the difference between Recovery Mode and DFU Mode?
Recovery Mode shows an Apple logo and a “Connect to Computer” screen, and it can update software without erasing data. DFU Mode keeps the screen completely black and bypasses the operating system entirely — it’s a deeper fix typically used for stubborn boot loops.
Will putting my iPhone in Recovery Mode delete my data?
Not necessarily. Choosing Update in Recovery Mode reinstalls software without erasing anything. Choosing Restore does erase the device, so always try Update first.
What does a red Liquid Contact Indicator mean?
It means the phone has been exposed to liquid internally. Stop troubleshooting at home and take it to an Apple Store or authorized repair provider instead.
How long should I let an overheated iPhone cool down?
Move it somewhere cool and shaded, unplug it from any charger, and give it 15–30 minutes before trying again.
How can I back up an iPhone that won’t turn on?
If it still connects to a computer, even in Recovery Mode, you may be able to back it up through Finder or the Apple Devices app before restoring. If iCloud backup was already enabled, your data is likely already backed up automatically.
Is iTunes still used to fix an iPhone in 2026?
Not primarily. Apple now recommends the free Apple Devices app for Windows users, which handles the same restore and backup functions Finder handles on a Mac. iTunes still works as a fallback on some older systems.
How much does Apple charge to repair an iPhone that won’t turn on?
It depends entirely on the model and which component failed, and whether AppleCare+ applies. Getting a quote directly from Apple or an Authorized Service Provider is the most reliable way to know your actual cost.
When should I stop troubleshooting and go to an Apple Store?
Stop immediately if you see a red Liquid Contact Indicator. Otherwise, if you’ve worked through force restart, Recovery Mode, and DFU Mode with no change, it’s time for a professional diagnosis rather than continued attempts at home.
Conclusion
Most of the time, an iPhone that won’t turn on is fixed somewhere in the first three steps of this guide: a proper charge, a force restart, or a quick check of the charging port and cable. The deeper fixes, like Recovery Mode and DFU Mode, exist for the smaller number of cases where software has genuinely broken down, and they’re worth trying before assuming the worst.
If you’ve gone through every step here and your iPhone still shows no signs of life, that’s a clear signal you’re dealing with a hardware issue rather than something you can fix at home. At that point, an Apple Store, an Apple Authorized Service Provider, or Apple’s mail-in repair option is the right next move — and knowing your data is backed up beforehand makes that trip a lot less stressful. Whatever situation brought you here, working through how to fix an iPhone that won’t turn on in this order gives you the best shot at getting it back safely, without losing anything along the way.




2 Comments